Blog Search

Seven Things to Know/Do Before the Open

By: 0

[vc_row padding_top="0px" padding_bottom="0px"][vc_column fade_animation_offset="45px" width="1/1"][text_output]Seven Things to Know/Do Before the Open Written by Brandon, Fixed by Jess (And every day, really.) The open is right around the corner, and it’s time to start becoming more aware. Aware of your goals, your body, the clock, the reps you have left, the plan you are sticking to, what your are telling yourself in your head. It’s normal to not be terribly aware of your surroundings in a workout when you’ve been training less than a year and it takes a while, so don’t worry - it comes with practice. Even with practice, it’s important to be aware of negative habits that can slip into your training sessions and your mind.   7. The coaches see it all, the shaved reps intentional and unintentional Keeping count of your reps when extremely fatigued is hard. You may not notice missing a rep or two (and let’s be honest, there are times when you do) but the Open is when you’ll regret getting into the bad habit of bad reps. So start paying attention and start now. Count out loud if you have to, if you have a hard time keeping count - use a marker board to track them. Grab your phone, and record yourself so you can see if you’re hitting the standards. Judges won’t turn a blind eye to bad reps. Bad reps don’t count in the Open and one rep can make a big difference.   6. Know the difference between Scaled, Modified, and RX The difference is not that Carl is better than Brandon in all of life because Carl just did that workout RX and Brandon did not. The difference is in the form, the mechanics and consistency. Our goal first and foremost (and what yours should be too) is to avoid recipes for injuries. The RX score is something to be earned. It means you did every rep to the RX standard of that movement, and the full amount of repetitions in that workout. It’s okay to scale a workout to preserve the stimulus we are trying to accomplish with that workout - even in the Open. If you can’t get a muscle up, those chest-to-bar pull ups are going to feel just as nasty. Don’t leave anything to chance. We will (in any workout - not just the Open) tell you if you weren’t touching your toes to the bar or hitting the wall ball targets and your workout is, therefore, scaled.   5. Know your goal, know your goal, know your goal We aren’t talking life goals, or full on yearly athletic goals, that’s a talk for another time. Let’s talk smaller. Goals for the WOD at hand. Be Specific: Give yourself a range of what success would look like to you in each WOD. Adjust them for each workout. Bad Goal: I want to win the open / crush everyone in this workout Good Goal: I want to try to perform a 1 round per every 2 minutes during this workout. Be Realistic: Base this goal off of prior data and knowledge. Know your  numbers, what you can squat, how many pull ups you can do unbroken. You will often shoot too low with your goal, but more often you’ll shoot far too high. This is why numbers are important, know how your rep schemes and how to thingk them up. Pay attention to that stuff and write it down.   4. Get Some … Motivation Set your goals too far out of reach and your plan will go to shit, making it hard to stay motivated through the WOD, and the rest of the Open. The words you are speaking to yourself should be positive, affirming, and instructive. Research has found certain forms of self-talk is most useful for movements that require fine motor skills such as Olympic weightlifting or Challenging Gymnastics movements. What you say to yourself can improve focus, mental readiness, self confidence, and help you cope with difficult circumstances. Psych yourself up and find what helps you maintain your drive to succeed. Motivational self talk can also reduce the rate of perceived exertion in athletes, for improved performance during strength and endurance events. Get a mantra, sing a song, whatever. Need some suggestions? Here: Focused self talk: “Chest Up,” “Knees out,” “Extend” Motivational self talk: “Light weight!” “All day!” “Just one more rep...”   3. Lose the Attitude It’s not just about the words you say, it’s the attitude you have. Understand where it’s coming from. There is no time for negativity when the clock is running. Identify what is going on in your head so that when you hear it, you can overcome it. If this negativity is happening while you are not in the middle of a workout, take some time to meditate. Imagine that you sitting down, and your mind is a television. Now imagine you can see the negativity drift in front of you. Be aware of it, but allow it to pass in front of you and continue on its way, separating yourself from it. Quiet Down: Imagine you are turning the volume down on your t.v. so all that shit is silenced. Replace it with the positive self talk above, repeat.  2.5  Control Yo’ Self: Ever see someone who trains great but chokes in competition? It’s about controlling your anxiety. Side Note: Learn how to control your breathing (click here and follow this gif to control your breathing rate). The app “Headspace” is a fantastic app for that. Avoid postures of defeat: Pick your chest up and fuckin’ smile! Fake it until you make it. Slumped shoulders, frowning, hands on knees, will start to play into your psyche and in turn bleed into your performance. Click here to check out a really good TED talk on your body language. Don’t focus on how much it hurts, focus on small chunks of the workout, and how you can overcome each as its own individual obstacle.   2. Be Confident Don’t make excuses for yourself: I’m too short, too old, too weak, I’m not good enough. These are all a means to justify you to not take action. They become ingrained in your mind as self limiting beliefs. Don’t show off, don’t whine, don’t complain just to seek external validation. Confidence comes when you stop seeking approval of others and learn to validate yourself. Face your fears. Fear is part of the human conditioning, allowing it to control you is not. Challenges and setbacks are inevitable. You have the choice to view them as positive or negative. As obstacles to success or opportunities to learn and grow. Visualize your success and make that a part of your daily routine.   1. Develop a growth mindset, not a fixed one In a fixed mindset intelligence is static, this leads to a desire to look smart and therefore a tendency to… Avoid challenges / Gives up easily / See efforts as fruitless or worse / Ignore useful negative feedback / Feel threatened by the success of others / Lie about results With a fixed mindset you’ll plateau early and achieve less than your full potential. In a growth mindset, intelligence can be developed, fueling a desire to learn and therefore a tendency to... Embrace and seek out new challenges / Persist in the face of setbacks / See effort as a path to mastery / Learn from constructive criticism / Find lessons and inspiration in the success of others As a result, you will reach higher levels of achievement giving you a greater sense of free will and a will to give your all in every WOD and everything you do.[/text_output][/vc_column][/vc_row]

Feeding The Soccer Animal

By: 0

[vc_row padding_top="0px" padding_bottom="0px"][vc_column fade_animation_offset="45px" width="1/1"][text_output]

It's 6am. Your eight-year-old's soccer practice is in one hour. You know she should eat something, but what? And how do you get him to EAT?

During tournaments, kids sometimes play three intense games in a single day--especially at the end of the tournament, when there's more on the line. If it's a teen, we could be talking one long 80 minute game. "A single bad shift change can cost you the tournament."  Little things matter. Nutrition is a BIG thing. Many parents believe their kids can eat virtually anything without affecting their performance. As a coach, I can testify to just how wrong they are. A kid who fades out 40 minutes into practice will get 33% less coaching time, because they're too tired to improve. A kid who's too hyper at the start of practice will usually distract the coach, or earn a few laps, which detracts from his time to learn. Kids who don't eat breakfast simply won't play their best in the third period. An overstimulated kid will probably draw an unnecessary penalty or draw an unnecessary offside. Fortunately, there's an answer, and it's not force-feeding your kid. Here's an easy way to make sure they're getting what they need (and will want to eat it!) 1.Protein  You know protein builds muscles. But on game day, eating protein can help by slowing down the absorption of carbohydrates. Without fully explaining the Glycemic Index, here's how carbs work: some break down slowly, giving you sustained energy; some break down quickly, giving you peaks and valleys. Protein slows that breakdown, helping with sustaining energy levels for longer. You need protein and/or fat with carbs on game day. 2.Carbs  Your body primarily runs on carbohydrates during sport (though there's some fat metabolism, too.) But just like gas in a racecar, you don't want to run out. If you're eating sugar, white flour or fruit without anything else, you'll get a massive energy dump at first...and then nothing when you need it later. At Crossfit South Bend, we explain carbohydrate breakdown as a thermometer: let's say you want to keep your house heated to 20 degrees. If you burn sugar, that thermometer will jump to 40, and then quickly drop to 10. If you burn grains (even "whole wheat") you'll pop up to 35, and then drop to 15 pretty quickly. But if you're burning vegetables, you'll go up to 25, then back to 18. And if you add protein or fat to the meal, you'll hold 20 degrees for a long time. Eat vegetables, or combine protein and/or fat with your carbs to keep that energy level consistent. What are some of the worst carbs to eat? Breakfast bars. Muffins. Bagels. 3.Fat Fats don't make you fat. Kids need fat in their diet (so do adults, especially in South Bend, where our skin dries out and our brain gets depressed in the winter.) Fats are a secondary energy source. When the carbs are gone, fats fuel the fire. Use nuts and seeds to provide healthy fats. Heck, eat bacon: I'd rather coach a kid who ate bacon for breakfast than one who had a bagel. CrossFit South Bend-6 BONUS: The carb-up myth. Some parents and coaches believe that kids should "carb up" before a practice or game, and feed them a bagel or pasta. This isn't true, will probably decrease performance, and should be stopped. Feeding a kid a bunch of grain-based food immediately before practice will slow him down. Grains pull water out of the muscle and into the stomach, causing cramps, an "overfull" feeling, and sluggishness. Want to slow down a racehorse? Give him a pail of grain right before a race. Want to slow down your kid? Do the same. If given a giant bowl of pasta the night before an early practice, your child's stomach will be clear. But the insulin spike from the carb-heavy meal will leave them with a sugar crash in the morning; they'll feel tired, crabby and sluggish until they eat more sugar, and then ride that roller-coaster all day. Even most marathon runners, who need prolonged energy at low levels over several hours, are starting to trend away from this bad habit and instead opt for a combination of carbs, protein and fat the night before a race. Adults tend to choose foods based on taste, but research shows this isn't true for kids. Kids make food choices based on, in this order: 1. Novelty 2. Texture 3. Taste. "Novelty" can mean appearance, or activity surrounding the food, or presentation. If you look at packaging on "kid food" as an adult, you'll think the manufacturer went way overboard on bright colours and shooting stars. But they know better: to a kid, the shiniest box contains the best-tasting food. Luckily, we can use their knowledge for our own (less-evil) purposes. Packaging food in a unique way, arranging it on the plate to make a picture, making it finger-edible, placing it in a different spot in the house...kids' brains are wired to pay attention to novelty. These things all help. Filling a special "soccer day" bowl with grapes, nuts and cheese to eat on the way to the rink can help. A picnic on the floor while sorting soccer equipment can also help. A final tip: turn off the tv while getting ready in the morning; no meal can compare to the shiny distractions on the screen. Letting kids choose their fruit in the grocery store can also help, because their sense of ownership will combine with the novelty factor. Texture: in the morning, stick to crunchier, more texture-rich foods. While some kids will eat a banana (or yogurt) in the morning, cereal companies bank on how a food FEELS when it's being eaten. It's psychological, but few people wake up starving, and eating soggy cereal is unappealing anytime. What's crunchy? Fruit. Nuts. Taste: It has to taste good, but that doesn't mean you need sugary cereal or fake yogurt in tubes. "Natural" sugars like syrup and honey aren't better than table sugar, but fruit goes a long way. Your kid doesn't need a big breakfast, and it doesn't have to be perfect every time. Some cut up fruit or raisins; a little handful of nuts; and a piece of cheese or stick of bacon will go a long way. But when a kid hops out of the back seat with a Tim Horton's muffin and a hot chocolate, her coach knows she'll be hyper for the first ten minutes, then tired and cranky for the next 50. PRESENTING THIS TO YOUR KIDS Make sure you implement this early on in training, not just on game days. Typically you don't want to change anything up on game day that you hadn't tried and tested extensively during training - meaning. If your kid has spent the entire training season eating spaghetti and chocolate milk, don't change their diet aggressively for just one day, keep the habit throughout the season. GOOD-BETTER-BEST We approach eating on a scale of "Good-Better-Best." Good: they ate something. This isn't enough for athletes, but kids who are just lazing around the house can get by with cereal in the morning. Better: they had some protein with their breakfast carbs. Cereal bars can even be okay if paired with an egg or bacon. Best: they practiced solid nutrition for at least three days before a tournament. Treats once every three days or so (rather than 3x/day.) "Eat meat and vegetables, nuts and seeds, some fruit, little starch and no sugar." - Greg Glassman, founder of CrossFit. Need more help? We'll come and talk to parents on your team for FREE. Email Carl@crossfitsouthbend.com Or if you are looking to get your kid or teen training at CrossFit South Bend - Click here to Schedule a Free No Sweat Intro with us at CrossFit South Bend During the No Sweat Intro we will meet for a private 20 minute chat about your goals - your kids goals, and what CrossFit South Bend can do to help you and your family to achieve those goals. No pressure, no obligation. Just a chance to see if CrossFit South Bend is a good fit for your family. [/text_output][/vc_column][/vc_row]

Simple Muscle Up Program

By: 0

[vc_row padding_top="0px" padding_bottom="0px"][vc_column fade_animation_offset="45px" width="1/1"][text_output]This is meant as a little journey for you on your way to getting a muscle up, know that there are quite a few ways to develop a muscle up, I've even done an another post on it a while back right here for a completely different progression.  There are soooooo many ways to develop them. But here is one way. In the diagram, what I mean by a clean pull up, is a pull up that is strict and smooth, that will get your clavicle at or above the bar and you have complete control over your body. In the diagram above, what I mean by a clean deep ring dip, can you control the rings on descent with a neutral ring position (not internally rotated) touch your shoulders to the rings, then ascend without overextension and internally rotating the shoulders? I also want the body hanging off the ground with straight legs. This is why we prefer strict movements in strength prior to the kip - there is a place for each within a specific context, but strict work will lay a better and safer foundation than kipping work will for a volume of gymnastics. Sure, you can get a muscle up with numbers that aren't exactly within the range of prerequisites above by kipping like hell, but here is what you are looking at... [/text_output][/vc_column][/vc_row][vc_row padding_top="0px" padding_bottom="0px"][vc_column fade_animation_offset="45px" width="1/3"][promo image="13747" alt="" id="" class="" style=""]If you have below the prerequisites for strength, you have to have stellar technique, or at least a lot more than what you would need if you had the right amount of strength. Your chance for injury goes up - this also goes up or down depending on a lot of other factors - flexibility and stability in the musculature itself, the amount of volume you are performing, relative to the amount of volume you are adapted to, etc.[/promo][/vc_column][vc_column fade_animation_offset="45px" width="1/3"][promo image="13748" alt="" id="" class="" style=""]If you have exactly at the prerequisites of strength, the amount of technique you'll need will go down, as will the chance for injury...again this also goes up or down depending on a lot of other factors - flexibility and stability in the musculature itself, the amount of volume you are performing, relative to the amount of volume you are adapted to, etc. when you get your very first muscle up in practice, is not the time to immediately do 30 muscle ups for time.[/promo][/vc_column][vc_column fade_animation_offset="45px" width="1/3"][promo image="13749" alt="" id="" class="" style=""]If you have well over the prerequisites of strength, the amount of technique you'll need will go down greatly - not that you don't want to practice technique, as having high markers in both will result in your ability to hit big sets with beauty. the chance for injury will go down a great deal as well - assuming you have flexibility in that very stable area. The volume you are performing still does have a factor, its all relative to what ability level you are at, no one is safe from injury with stupid programming and neglect for flexibility and stability.[/promo][/vc_column][/vc_row][vc_row padding_top="0px" padding_bottom="0px"][vc_column fade_animation_offset="45px" width="1/1"][accordion id="" class="" style=""][accordion_item parent_id="" title="Keep It Simple Gymnastics Strength Work" id="" class="" style=""]

 Simple Frequency Method 

1.Take what you are trying to improve, push ups, pull ups, ring dips, etc. and hit one max unbroken set. Divide that total number by about 50-60%, that is your starting rep set. 

For example:

Lets say Sally can hit 5 pull ups in one sitting, we are starting with sets of 2 (round down preferably when dividing, starting easier is better than starting too hard)

SIDE NOTE: If you cannot perform a repetition at what you are trying to perform, there are a ton of scaling options to start this at, for instance...

Push Ups: Incline Push Ups, Bench Press, Knee Push Ups, Negatives

Pull Ups: Isometric Holds, Negatives, Banded Pull Ups, Ring Rows

Ring Rips: Isometric Holds, Negatives, Static Dips, Seated Dips

WARNING: Negatives make new trainee's very sore, so be careful in progressing them, no more than 10% volume a week. maybe even adding in an extra rest day.

There are many more things you can do for accessory work - I like therabands or crossover symmetry for some shoulder prehab - but this post is for those of you who are doing this stuff from home or office and don't have access to a ton of equipment.

2. Start with an amount of volume of sets that feels easy, almost too easy

For example, lets begin with 6 SETS of 2 REPETITIONS.

3. The time of day to perform

These are to be spread as evenly throughout the day as possible, one in the morning, one at night, one at lunch, and the others sprinkled throughout - if you cannot make this work there are other methods of putting it all into one block of repetitions, but thats a story for another blog post. Performing 12 repetitions split evenly throughout the day has less chance to develop volume injury issues than doing 12 all at once. If you need things split into 2-3 sets a day, or all at once because you only have access to the equipment once through the day, thats a cause to sit down and chat with us about how to make that work.

4. Number of days per week

You'll perform, this every day of the week, with the exception of Sunday.

Monday 6x2

Tuesday 6x2

Wednesday 6x2

Thursday 6x2

Friday 6x2

Saturday 6x2

Sunday REST

5. Fatigue, Injury, Managing Volume. 

RULES:

*Every set should feel easy, it should never come close to failure

*You should never have to break technique to squeeze in a rep

*If you have mobility issues, address them before starting the program, you are adding volume to something, so things will tighten up a bit. If you add volume to a bad movement pattern and already tightened musculature and ignore correct movement patterns, you'll get injured.

*you can squeeze in a couple sets pretty close together, but that also increases your fatigue rate, so remember that.

*be careful of any other programs you may be doing on account that we don't program to suit YOUR volume of extra stuff you are doing, you may have to be intelligent enough to modify some movements that may push you over the edge.

6. Progressing.

Add a set, or a rep per week as recovery will allow, ONLY, and ONLY if the last week's sets were easy.

For example:

WEEK 1: 72 total weekly reps

Monday 6x2

Tuesday 6x2

Wednesday 6x2

Thursday 6x2

Friday 6x2

Saturday 6x2

Sunday REST

WEEK 2: 84 total weekly reps (14% jump in total volume)

Monday 7x2

Tuesday 7x2

Wednesday 7x2

Thursday 7x2

Friday 7x2

Saturday 7x2

Sunday REST

WEEK 3 : 108 total weekly reps (28% jump in total volume)

Monday 6x3

Tuesday 6x3

Wednesday 6x3

Thursday 6x3

Friday 6x3

Saturday 6x3

Sunday REST

WEEK 4 : 126 total weekly reps (16% jump in total volume)

Monday 7x3

Tuesday 7x3

Wednesday 7x3

Thursday 7x3

Friday 7x3

Saturday 7x3

Sunday REST

etc. Only climbing sets or reps as the last week should feel EASY - I don't like to jump more than 30% of total volume per week otherwise I noticed most people doing this (general population whose main job isn't recovering from an aggressive program) start to get little twinges and tweaks in the area worked on and usually results in a two week backpedal. But this volume of increase is depending on the athlete i'm working with as well - if you have all your ducks in a row, bigger jumps may be in order.

7. Continuing

Continue this until you hit your goal, or pass your goal, and remember - progress is NEVER a straight line. It has a few slants and zig zags in there, you may have a setback, and you may have to move in a few different directions to get to where you need to be. As you leave the area of the Novice and into intermediate, the more advanced methods and tools will become useful for you. Developing 1 pull up, is different from developing 20, which is different from developing a 150b weighted pull up. Remember that.

[/accordion_item][accordion_item parent_id="" title="Keep it simple Technique Work" id="" class="" style=""]Simple Technique Work Im going to throw some videos in here, but just remember, throwing in the attempts for muscle ups prior to having the strength to perform them, is asking for it. Technique and Skill work is meant to be non exhaustive, once you start to break technique on account of fatigue, STOP. just...stop. Keep in mind, there is much more out there than what is below, its just some good stuff that works, to some degree there can be a lot of personalization that goes into this with specific false grip work and transition work that fits your own needs. 10 minutes of practice works well Dip to upper arm support - Helps with both false grip and non false grip Toenail transition - better for false grip transitions Non false grip transition - This is video number one, he carries it through somewhere around 6 videos. False grip transitions - This is video number one of a few as well, continue through the videos a few good books - overcoming gravity by steven low, and freestyle by carl paoli. [/accordion_item][accordion_item parent_id="" title="Want us to program something specifically for you?" id="" class="" style=""]Want us to program something specifically for you? Click here to email us to let us know what you are interested in learning! Once you've emailed us, we'll look it over and give you the best idea of what its going to take to get you there.[/accordion_item][/accordion][/vc_column][/vc_row]

Supporting your wrists for CrossFit

By: 0

[vc_row padding_top="0px" padding_bottom="0px"][vc_column fade_animation_offset="45px" width="1/2"][image src="13264" alt="" href="" title="" info_content="" lightbox_caption="" id="" class="" style=""][/vc_column][vc_column fade_animation_offset="45px" width="1/2"][text_output]Lets talk about wrist support for CrossFit. Now that CrossFit has gone pretty mainstream, if you google "wrist wraps" - you won't find any shortage of every person in the world trying to get in on the CrossFit product game with  their own variation of a product. When you have a lot of weight on the bar, it tends to pull the wrist into a great amount of extension, the purpose of a wrist wrap is to provide support to the wrist during a pressing movement, or when the arm is in flexion and external rotation like the rack position - by limiting the extension of the wrist. Here are a few things to remember. 1.Don't isolate the wrist to get around a mobility issue. I see people grabbing their wrists after a clean, or during wrist supports in discomfort. Wrapping your wrists to move around a mobility issue is treating the symptom, not the source of the problem. Now treating the symptom and the source can be done in conjunction with one another, but don't ignore the source of your problem, which is more than likely poor mobility in your shoulders, extension in thoracic, forearms, and wrist flexibility. Wrist wraps also block the wrist, and will more than likely demand greater flexibility from the shoulders. So either work on some front rack mobility or some wrist mobility, or a little bit of both. Front Rack and Wrist mobility 2. Warm up without your wrist wraps. Warm up without them and allow your wrists to get into that full extension and flexion, wrapping your wrists up all of the time will more than likely encourage stiffening your range of motion, so that when you do take them offer, you'll further damage them. You don't need wrists wraps to move the bar, if you do, and if it hurts that bad that you have to use wrist wraps during a warm up - refer to the next one. 3. If it hurts, don't do it, or pull it back. Be smart, if it hurts. Ask a coach - Come up with a plan on how to fix it, and stick to it. Don't do the movement - let it rest, substitute something different Lower the weight - If it hurts, pull it back until its feeling better Do mobility - I don't feel sorry for you if you don't do anything to fix the problem. Get them checked out - If you are concerned about them, go get a medical professional to check them out. 4. Learn how to use them appropriately. Take a look at the image provided, this gives you a good idea of some of the wrist wraps out there and how to use them. Make sure  you use the wraps correctly and for their intended purpose.   http://breakingmuscle.com/video/video-mobility-for-the-front-rack-and-jerk-position[/text_output][/vc_column][/vc_row]

Training Season – by Jessica Sieff

By: 0

[vc_row][vc_column width="1/1"][text_output]Training Season – Jess S. Every year in March, around the time the CrossFit Open has ended, CrossFit athletes who aren’t going to regionals or to the Games hear the same declaration in gyms all around the world: The Open is over. Training season has begun. Those four little words, “training season has begun,” sends a shrill down the steely spines of athletes young and old, small and tall – the flexible and the otherwise awkwardly immobile… Training season has begun. We walk around super excited like kids comparing our wish lists for Christmas or Hanukkah (that’s right … represent). “What program are you doing this year?” “Are you getting ripped?” “Are you getting jacked?” “Are you gonna get shredded?” “Are you going to fold yourself into a pretzel and then do a muscle up – with one hand?” “Totally. Me too.” Hell yeah. Training season has begun. This morning I set myself up for a set of 10×3 backs squats at 70-75%. I warmed up. I felt good. Full disclosure my coach does NOT know I’m writing this right now. So I have no idea what she’s going to think when I say that as I got up to 70% something just started wavering a little in my brain. Maybe it’s that I’m coming back from having some hip issues and I haven’t squatted in a while but in all honesty, 70% is not that heavy for me yet I was instinctively afraid of it. “I’m not sure about this,” I thought to myself. “Hrm. Well. That’s heavy. I’ll try it. No, wait, I’m going to edge off the weight just a little bit. Okay. Set two.” I started taking more time between sets. It was taking me at least three minutes to build up the courage to do THREE squats. I knocked the weight down a little more. My monkey brain came alive. “Why is this freaking me out so much? It’s not heavy. Is it heavy? What did I eat last night? Is that it? Is it because I had dessert? No. I’ve had dessert before. Did I not sleep enough? I don’t get it. Let me just – no, still freaked out. Is someone going to get mad at me? Coach will totally be mad at me. There are only three other people in this gym right now. Are they all mad at me? This is ridiculous. Just squat it. There. Shit, I don’t know if I can do this for five more sets. Sure I can. It’s light. It doesn’t feel light. I’ll walk over here and then walk back and it will all be fine. Nope. Still not so sure about it …” And then I remembered something I’d read recently in a book, completely unrelated to CrossFit. In the book, the author mentioned this theory about seasons. He said we all experience seasons – seasons when we might be laser focused on certain objectives, or battling a particularly busy time in our studies or our work. Maybe you’re raising a tiny human and balancing that with managing those other little things, you know, like paying bills and keeping your house from falling down. Maybe you are chest deep in writing your dissertation or you’re defending it or something. I don’t really know what it means to defend something like that but if that’s you – I hope you have a sword because it seems to me that a sword would come in handy in the case of defending something like that. Plus it’s just really cool to have a sword.[/text_output][container][vc_row_inner padding_top="150px" padding_bottom="150px" border="none" bg_image="12417" parallax="true"][vc_column_inner width="1/1"][/vc_column_inner][/vc_row_inner][/container][text_output]Maybe you’re about to move your entire family into a new house. You’re starting a new job. You have new responsibilities at your current job. Any of those things qualify as a season. You have shit to deal with – and that might mean this is not training season for you. I’m a writer. You might not know that because I don’t write a lot for public consumption right now. I write talking points. And memos. And recommendations. And sometimes, sadly, I have to write people’s emails. Email is hard, guys. The struggle (for some) is real. This morning, while I was spending SO MUCH time considering a single set of squats I realized something. I’m not in training season. I’m in, ‘just trying to do the best I can at the workout’ season. I’m already dealing with new responsibilities at my job, I’ve made a commitment to study and write more every night so I don’t lose my passion for doing so. Between all of that – the writing, the work, the commute, getting groceries, paying bills and making sure my family still recognizes my face – I’m about as tapped out as I can possibly be. So what does that mean for my training season? That doesn’t mean I don’t try. That doesn’t mean I don’t push. It means I had to listen to my body today. And I’ve gotten better at that over time. Sometimes, I do have to knock down the weight. Some days, mentally, I just can’t handle mustering up what it takes to hit the numbers that I want to hit. And that’s okay. It doesn’t mean I won’t hit them. When I listened to myself this morning, I still felt challenged by the rest of the sets and I still felt worn out by the end of my workout. When you work to your capacity – that’s when you feel the challenge and the triumph. But you have to know that capacity is fluid because it’s not all centered on your strength. It’s also reliant on your emotional and mental wellbeing. We CrossFitters are bonded by more than just the surface goals of losing weight or getting healthy or building muscle or bending ourselves into a pretzel. We’re bonded by our hunger for reaching goals and setting new ones. We’re bonded by wanting more. That can make us feel, at times, that we have to run ourselves into the ground to hit the highest number on the whiteboard. We don’t. We’ll do better in the long run if we don’t. You’ve seen the memes that say, “What are you training for?” “Life, Mother F$%#er.” It’s true. That’s what we’re training for. That takes a lot. If you’re beating yourself up over your performance in the gym … if you’re hesitating at every work out and doing an incredibly good job of talking yourself out of even just coming in... Maybe you just need to recognize your season. Take some of that pressure off of yourself. Come in and just move for an hour. I guarantee your body will respond. It’ll guide you to how far you can go. And you’ll get stronger with every step.[/text_output][/vc_column][/vc_row]

Getting Better at Toes To Bar

By: 0

[vc_row][vc_column width="1/1"][text_output]Hey everyone! Here is some content for you to work on for getting some simple Toe to Bar Practice, by order of what I believe to be most important. Plenty of links and information, just start with one thing until you wrap your head around it, then move to the next. Once you feel you have one area of this tacked down, move down to the next. Start with Mobility, Developing Strict TTB, Kipping Technique, Adding Volume for Workouts.[/text_output][accordion][accordion_item title="Mobility for Toes to Bar"]1. Warm up properly with this Gymnastics Wod Video prior to doing your mobility 2. Get some mobility on with this video by Kstar  make sure your Shoulders aren't clonky, and your hips can fold with no issues. Once you have the prerequisite range of motion in your shoulders and hips for Toes to Bar, you have the green light to get into some Strict work! [/accordion_item][accordion_item title="Developing Strict Toes to Bar"]1. Check this video out from the guys at the movement fix here, this is a little bit of mobility and strength work by greasing the groove and getting some of the movement in. 2. If you find that too easy, begin to work on: L-sit Progression 1 L-sit Progression 2 L-sit Progression 3 3. After you can comfortably perform plenty of L-sit Progressions through the third progression. Begin to Work through some Toes to Bar Negatives pulling your legs up as high as you are able, then controlling down like this After you can comfortably perform strict toes to bar, lets move to the kip![/accordion_item][accordion_item title="Kipping Toe To Bar Technique"]I completely understand you can get to performing Toes to Bar faster if you kip. But thats not the point, if you want quality, injury free toes to bar, and you want to be able to get some volume of Toes to Bar with less issues, developing strict is the way to go first. You can practice kipping Toes to Bar in conjunction with developing the strict work, a good rule of thumb is, perform the strict work not for time, and when you feel like you can keep the quality up. Put the kipping work in the wods. 1. Gymnastics Wod Kipping toes to bar Progression 1 Kipping toes to bar Progression 2   [/accordion_item][accordion_item title="Ladder Volume Work on Toes to Bar"]Ladder Method
Frequency Method for Toes to Bar Alternative: The Ladder Method The Ladder Method is our weapon of choice when the trainee cannot use the Frequency Method to its full potential due to scheduling reasons such as being stuck in an office with no access to a pull up bar all day. A common mistake is to confuse the Ladder Method with the more conventional idea of doing a ‘pyramid’. Let’s look at the difference: Two Ladders of three reps will look like this: One set of one rep One set of two reps One set of three reps Then repeat the same process beginning at one set of one. One set of one rep One set of two reps One set of three reps
A Pyramid to three reps will look like this: One set of one rep One set of two reps One set of three reps One set of two reps One set of one rep The Ladder Method is greatly preferred over the Pyramid idea since it allows for better recovery during performance. The most difficult sets of the pyramid are clustered together at the apex of the pyramid, whereas with the Ladder, the hardest sets are followed immediately by the easiest sets. This allows for much more quality work to be completed in each session. The number of ladders and the number of ‘rungs’ on the ladder will depend entirely on the individual and their ability to perform toes to bar. The important thing here is that, like the Frequency Method, the top set of the ladder is not yet at the point where the last rep is extremely difficult. The idea here is accumulating a day’s worth of volume in a short period of time; therefore the sets need to be relatively easy in order to make it through the ladder. One can do ladders five to six times per week. The work is more concentrated than the work performed in Frequency Method sets since it is performed in one block of time instead of spread out throughout the day. This makes soreness and things like tendonitis (if they try to do too much too soon) an issue, especially for those just starting in this method.. It is important to gradually increase the work on these, and not make huge jumps in the amount of work being done per day/week. Start easy and add the days, reps and sets gradually. A solid goal to strive for with Toe to Bar ladders is five ladders of five reps. That’s 75 reps in a very short amount of time. “How long do I rest in between reps and ladders?” The answer to this common question is the amount of time it would take a partner to complete the set that you just completed. Think of it like this, if you and I are doing a ladder tag-team partner style, you would knock out a rep and then I would follow suit. Your rest period would be while I was doing my work and vice versa. Maintain this pace throughout all of the ladders.If you can’t keep up then you are doing much work for that day anyway, so reduce the number of reps per ladder, or drop a ladder, in order to make it more manageable.
So if you’re doing this one by yourself you need to bring your imaginary friend along to help you pace yourself. Just make sure if you are doing this in a commercial gym or any other setting where you are not alone that you do not converse with your imaginary friend too loudly or people will think you’re weird. “But what if I can’t do a toe to bar yet? If the trainee can’t do a toe to bar, then the first order of business is getting them the ability to do a toe to bar. Go back to the strength work and kipping technique until you can get a few.  
[/accordion_item][/accordion][/vc_column][/vc_row]

Simple Strict Muscle Up Progression

By: 0

[vc_row][vc_column width="1/1"][accordion][accordion_item title="The Progression Rep Scheme and Notes"]There are hundreds of ways to develop pulling and pushing strength for the Strict Muscle Up. This is just one simple way to develop some strength without complicating it too much. Basically, we are prioritizing good body position and increasing/decreasing body angle to increase difficulty. Progressing *You will begin at a scaling for each movement that you can perform three sets of 8 perfect repetitions at. *Continue with that specific scaling until you have reached three sets of 12-20 repetitions at that level, the reason for the range is that you may feel more comfortable at the next progression if you have three sets of 20 repetitions, some may feel comfortable at three sets of 12. *The decreases in depth angle for dipping and pulling are relative suggestions. I suggest a 5-10 inch drop in depth as you are progressing, make sure you know where you are with each set you perform, otherwise you aren't driving the same stimulus. *Body position is paramount with these progressions, you DO NOT move on until the reps are pretty. You must keep false grip in for all pulling, and you must perform everything with a hollow body and control.     [/accordion_item][accordion_item title="Progression Training Schedule"]Weekly Schedule Day 1 Pulling Progression 3 x max reps Day 2 Dipping Progression 3 x max reps Day 3 10 minutes of Transition Practice Day 4 Pulling Progression 3 x max reps Day 5 Dipping Progression 3 x max reps Day 6 10 minutes of Transition Practice Day 7 Rest [/accordion_item][accordion_item title="Important Videos to Watch Prior"]False Grip Position Ring Dip Positions (I don't need the full turnout, neutral is fine, but listen to his words when he states how bad that internally rotated position is) Hollow Body Position on Pressing First Transition Practice Second Transition Practice[/accordion_item][/accordion][/vc_column][/vc_row][vc_row][vc_column width="1/1"][accordion][accordion_item title="Pulling Progression 1"][promo image="http://crossfitsouthbend.com/wp-content/uploads/2015/04/IMG_9673.gif"]Progression 1 Start with something easy, make sure you can stay hollowed out and you can keep the false grip throughout the movement without losing it. Initiate the movement by pulling the shoulder blades together, touch the rings to your chest, then control yourself back down to the start. Once you can get Three sets of 12-20 repetitions at this progression, move to progression 2. Note: it is important that you finish the pull and touch the rings to the chest and you do so without using your hips to gain advantage.[/promo][/accordion_item][accordion_item title="Pulling Progression 2"][promo image="http://crossfitsouthbend.com/wp-content/uploads/2015/04/IMG_9674.gif"]Continue to move down once you have reached the criteria of three sets of 12-20 repetitions, keeping the integrity of the body and hand position. Make sure you measure where you are at in relation to where the rings are hanging. Make sure you know where you start each time so that you garner the same stimulus.[/promo][/accordion_item][accordion_item title="Pulling Progression 3"][promo image="http://crossfitsouthbend.com/wp-content/uploads/2015/04/IMG_9675.gif"]Each time you have reached the repetition criteria of three sets of 12-20 repetitions, you may move your feet forward 5-10 inches until you are directly under the rings.[/promo][/accordion_item][accordion_item title="Pulling Progression 4"][promo image="http://crossfitsouthbend.com/wp-content/uploads/2015/04/IMG_9676.gif"]Once you are directly under the rings, begin to move your feet up 5-10 inches at a time until you are on a 20 inch box, only progressing when you have reached three sets of 12-20 repetitions at the height you are at. Remember, don't use your hips to gain advantage, don't reach your head. Touch the rings to your chest. [/promo][/accordion_item][accordion_item title="Pulling Progression 5"][promo image="http://crossfitsouthbend.com/wp-content/uploads/2015/04/IMG_9678.gif"]Continue on to False Grip Strict Pull Ups, only count the repetitions if you make contact with the rings against your chest, pull each repetition as high as possible, keep the false grip in.[/promo][/accordion_item][/accordion][/vc_column][/vc_row][vc_row][vc_column width="1/1"][accordion][accordion_item title="Dipping Progression 1"][promo image="http://crossfitsouthbend.com/wp-content/uploads/2015/04/IMG_9692.gif"]These start positions for everything are relative, for pressing, note the hollow body position and arm position, elbows are tucked in, neutral head, everything moves at the same time. You may transition once you have reached 3 sets of 12-20 perfect repetitions[/promo][/accordion_item][accordion_item title="Dipping Progression 2"][promo image="http://crossfitsouthbend.com/wp-content/uploads/2015/04/IMG_9693.gif"]Continue moving down 5-10 inches, each time progressing only when you have reached three sets of 12-20 perfect repetitions[/promo][/accordion_item][accordion_item title="Dipping Progression 3"][promo image="http://crossfitsouthbend.com/wp-content/uploads/2015/04/IMG_9690.gif"]Moving all the way to the floor, once you can perform 3 sets of 12-20 repetitions at the push up without your thighs touching, only your nose and chest may touch[/promo][/accordion_item][accordion_item title="Dipping Progression 4"][promo image="http://crossfitsouthbend.com/wp-content/uploads/2015/04/IMG_9694.gif"]Once you can perform three sets of 12-20 push ups, you will move to the rings performing push ups with your shoulders pulled back, the rings remain neutral, and about 4 inches off the floor, pull through until you are at a deficit for the push ups. Once you can perform three sets of 12-20 repetitions at this level, move to the next.[/promo][/accordion_item][accordion_item title="Dipping Progression 5"][promo image="http://crossfitsouthbend.com/wp-content/uploads/2015/04/IMG_9688.gif"]Once you have passed the ring push ups, move to the rings, keep the rings neutral, shoulders remain back, keep the rings off the floor enough so that you do not have to bend your knees, pull deep into the dip position with a vertical forearm[/promo][/accordion_item][/accordion][/vc_column][/vc_row][vc_row][vc_column width="1/1"][accordion][accordion_item title="Muscle Up Transition 1"]Watch this video Start with this transition until you feel you can comfortably perform the turnover from the top and control your descent to the full hang with ease. Then move to the second transition.[/accordion_item][accordion_item title="Muscle Up Transition 2"][promo image="http://crossfitsouthbend.com/wp-content/uploads/2015/04/IMG_9689.gif"]Second Muscle Up Transition Once the first Transition has become easy, move to a banded transition keeping the elbows in and slowly decrease bands once they are seamless. Continue this until you no longer need a band.[/promo][/accordion_item][/accordion][/vc_column][/vc_row]

Tracking Progress and Using Disqus
By: 0

Hey guys, so I played around with using Beyond the Whiteboard for a little bit, beta testing it with my wordpress site, it doesn't integrate quite how I'd like it to, so now I am going to play with a new method of having you guys track your workouts called "Disqus" It looks like there has already been a tutorial written up, so lets have at it! It’s Time to Disqus! Written by Jaimie Bougie When I started CrossFit over four years ago, the only way that I knew how to track my workouts was through the ol’ pen and paper method. But in this day and age, there are many options to choose from when tracking your workouts that don’t involve carrying around a log book with you; there are apps on your smartphone, apps on your tablet, apps on your laptop….the list goes on and on. But did you know that you can also track your workouts and progress through our built-in Disqus blog commenting system? There are a couple of good reasons why you should be commenting your results each day to our blog. Our online community continues to grow – which is pretty awesome – and in order to get the most out of our community, we encourage everyone to post their results to the blog each day. Not only does this help our coaches track our community’s progress for tweaks to future programming cycles, but it will also helps you track your progress and facilitate discussions with fellow online blog followers. Here’s your step by step guide – plus some tips – on setting up  and getting the most out of the Disqus commenting system.

1. Create your profile.

There are multiple ways to create a Disqus profile in order to comment on the Crossfit South Bend blog. When you first visit the website and go to comment, you’ll notice the gray Login button to the top right of the comment box; when you click the down arrow, you will be provided with four options for logging in. For me, I always just use my Facebook account, because Disqus will automatically pull over information for me, such as my name and profile photo. If you would rather not have your social media accounts linked, you can just create a simple Disqus profile.   DisqusLogIn  

2. Now it’s time to post!

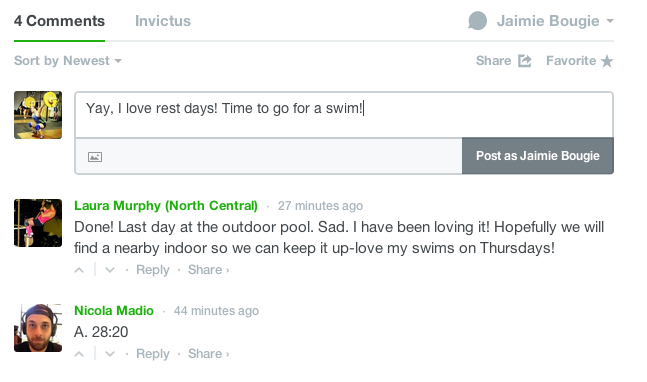
After logging in, you are all set to post away! We encourage you to post your workout results each day, but also comment your questions, thoughts and feelings on any of our blog posts as well. Posting is simple; just type your results or comments in the box and click the dark gray “Post as…..” button the lower right side. DisqusComment

3. Provide positive feedback and support to your fellow blog followers!

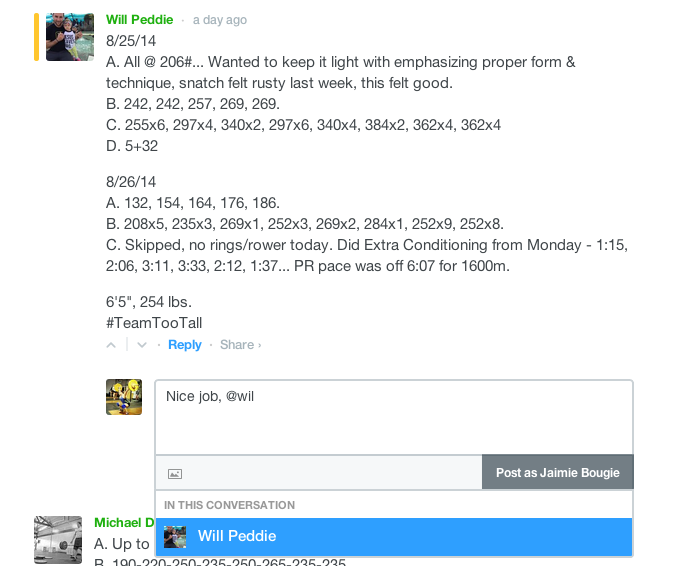
Not only is Disqus great for posting your results, but it’s also pretty awesome at facilitating conversations and support within our online community. At the bottom of everyone’s comments, you’ll see a gray “Reply” button. Simply click that and you’ll be able to post a reply comment to someone’s post. You can even tag others in a reply, as seen in the image below; simply type your message and then type @username for the user. DisqusReply  

4. Viewing your posting history

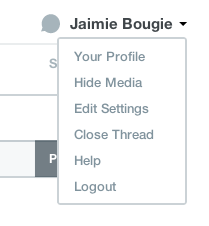
You can easily go back and view your posting history whenever you want! Simply click the down arrow next to your name by the commenting box and select the first option – “Your Profile”. This will bring up a pop up window showing your profile with your latest comment post at the top; from there you can scroll down through all of your comments! DisqusMenuOptions    Screen Shot 2014-08-28 at 9.47.25 AM

5. Changing your notification settings or updating your profile

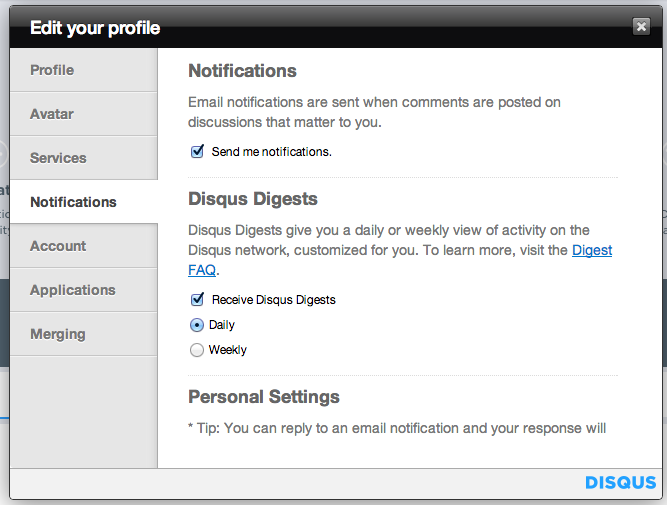
Want to know any time someone replies to one of your comments or questions? Simply click the down arrow next to your name by the commenting box and select the third option – “Edit Settings”.  You’ll be brought to the settings page, where you can update your profile, avatar image and notification settings. DisqusNotification  

6. Track Your Progress!

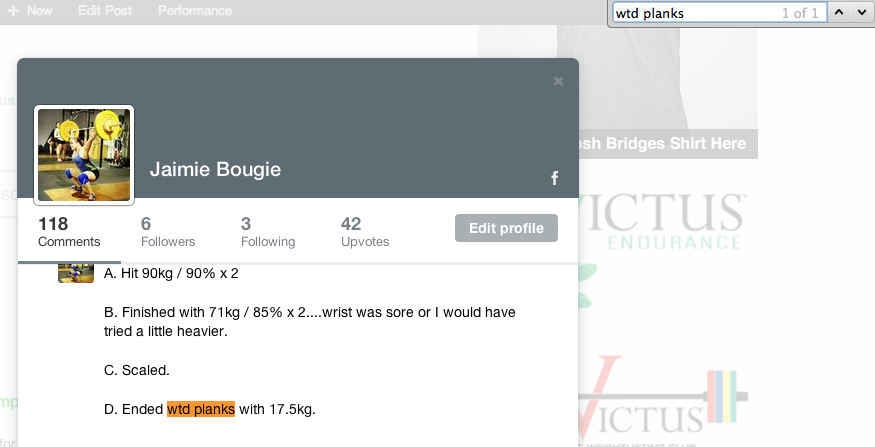
You can easily search back through all of your postings and results by using keywords to find a past workout. After bringing up your profile, you can then do a keyword search to search back through all of your past history/posts to find a specific workout. In the example image below, I did a search for every time I did a “wtd plank” to see how much weight I used in past workouts. DisqusSearch     If you have any questions about Disqus that was not answered in this blog, please feel free to comment below and ask away! I’ll do my best to answer any questions you may have.  Happy Posting!

Whole Foods and Crossfit South Bend Partnering Up!

By: 0

[vc_row][vc_column width="1/1"][columnize][image type="thumbnail" src="http://crossfitsouthbend.com/wp-content/uploads/2014/09/wpf-logo-b-300x69.jpg" alt="Text"] CFSB and Whole Foods are partnering up for the Whole Planet Foundation What is the Whole Planet Foundation? The Whole Planet Foundation works to end poverty by providing microcredit loans in the communities where Whole Foods products are sourced. The foundation's focus is on women in the developing world where a small loan can help an entrepreneur build a home-based business that creates an opportunity for stability and prosperity for her family. When you donate to Whole Planet Foundation, 100% of your contribution goes directly to microlending programs dedicated to alleviating poverty worldwide. In support of the mission to end poverty and help entrepreneurs all over the world, CrossFit South Bend will be out at Whole Foods Market in Mishawaka on Friday, Oct. 17th. Your donations will keep us working out from 4 p.m. to 7 p.m. while making it possible to end poverty and put more people to work in other parts of the world. Come on out for a good time and turn the tables on your coaches (and a few notable CFSB athletes) by telling them what their workout will be for a change. Where does the money go: Whole Planet Foundation® works to end poverty in communities where Whole Foods Market® sources products. $41.9 million authorized to microfinance institutions $29.8 million disbursed 330,000+ microcredit clients funded 1.95 million people supported $175 average first loan in the developing world 97% repayment rate 88% women clients Where does the money come from? $23.3 million from Whole Foods Market customers $13.3 million from Whole Foods Market $5.2 million from Whole Foods Market suppliers $5.2 million from Whole Foods Market team members $166,400 from online donors Click here to learn more about the Whole Planet Foundation[/columnize][/vc_column][/vc_row]